Twitter Sentiment Analysis on Google Cloud Platform
When I first started out in data engineering some three years ago, I was so eager to get my first pipeline up and running. I had heard that GCP was in style and I knew that streaming data was the name of the game. So I set out to build the Twitter Sentiment Analysis pipeline. What followed was about two months of frustration and heartache. I almost crossed the finish line, but for some reason (dependency hell) couldn’t get it to work outside of my local machine and I finally decided to move on.
Luckily I now have a better understanding of why and how to use the components in the pipeline and decided to build it again from scratch. It’s quite rewarding to revisit old project ideas from time to time. Especially when you have more experience under your belt.
Here’s the link to the GitHub repo.
Scope and architecture
By the end of this tutorial we will have set up the necessary resources to:
- Communicate with the Twitter API
- Send tweets to a Pub / Sub topic
- Subscribe to the Pub / Sub topic, clean tweets and call the Cloud NL API to get sentiment scores using an Apache Beam worker in Dataflow
- Send both raw and clean tweets alongside their sentiment scores to BigQuery
The pipeline steps look something like this:

Getting started
1. Twitter API Credentials
First, we need to apply for a Twitter Developer Account in order to communicate with the API. Head over to developer.twitter.com, sign up with your account, create an app, and save the associated keys on your local computer as you will need them shortly:
- API Key
- API Key Secret
- Access Token
- Access Token Secret
2. GCP Service Account
A service account is needed in order to authenticate our GCP services and allow them to communicate with each other. Head over to the Admin & IAM pane in the cloud console and create a new Service Account and add the following roles:
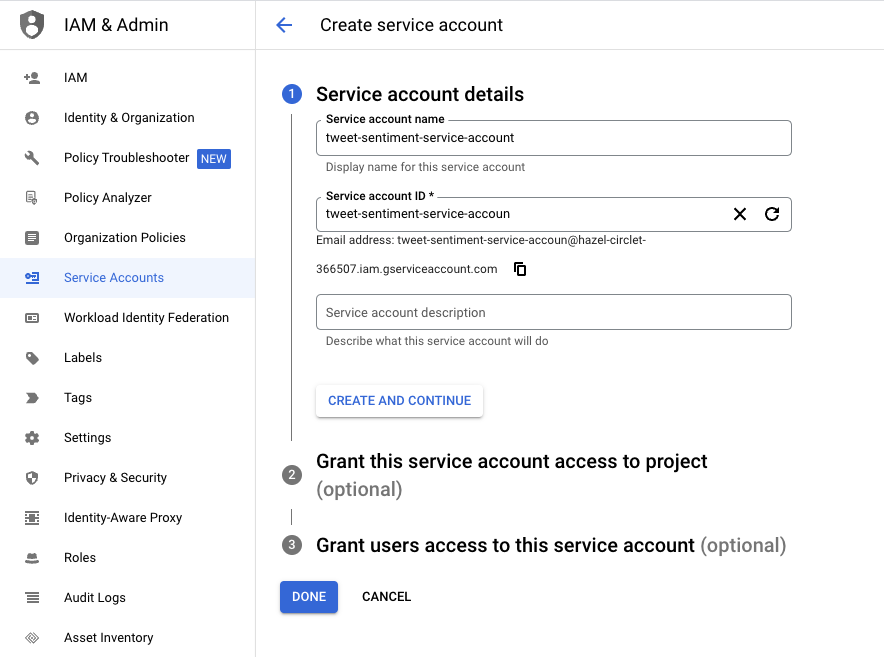
- “Pub/Sub Subscriber”
- “BigQuery Data Editor”
- “Storage Admin”
- “Service Account User”
- “Dataflow Admin”
Once created, click on the service account and generate a .json key. Save this to your local environment as you will need to reference it later on.
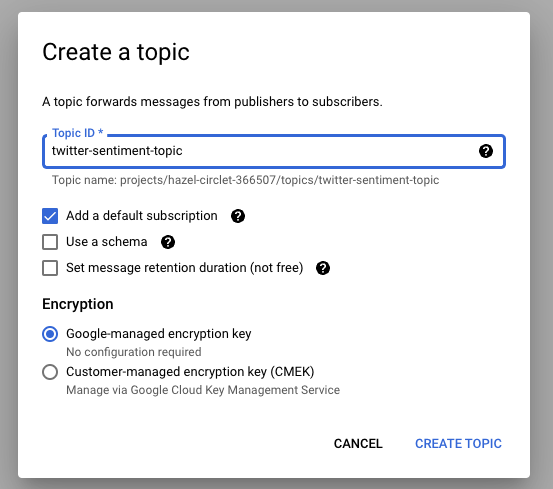
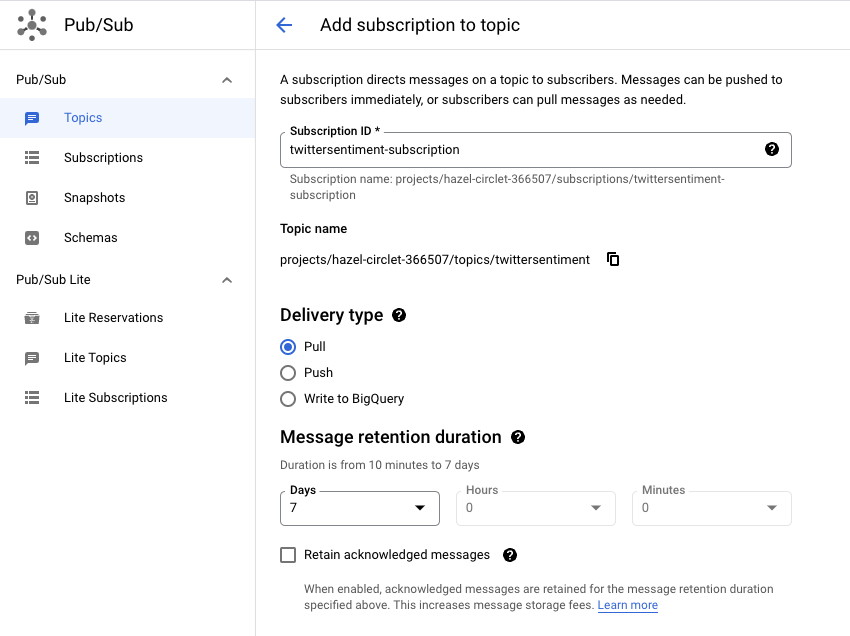
3. Pub / Sub
So far so good. Now we’ll head back to the cloud console and set up our Pub / Sub topic and subscription:
4. BigQuery
In BigQuery, create a new dataset and an associated table. Make sure to add the schema when creating the table:
text:STRING, id:STRING, created_at:STRING, timestamp:TIMESTAMP, tweet:STRING, sentiment_score:FLOAT, magnitude_score:FLOAT
5. Dataflow
Open up a terminal on your local machine, clone the Twitter-Streamer repo and start up your IDE:
git clonehttps://github.com/sharisiri/twitter-streamer-GCP.git
cd twitter-streamer-GCP
code .
Navigate to the Dataflow folder and run the following commands. Note that google-cloud-language is set to above v2 as per the GCP migration guide (although I haven’t tested any other version myself).
pip install ‘apache-beam[gcp]’
pip install google-cloud-language==2.6.1
Modify the credentials in beamtwittersentiment.py
import argparse
import json
import os
import logging
import apache_beam as beam
from apache_beam.options.pipeline_options import PipelineOptions, StandardOptions
import relogging.basicConfig(level=logging.INFO)
logging.getLogger().setLevel(logging.INFO)os.environ["GOOGLE_APPLICATION_CREDENTIALS"] = '<YOUR_CREDS.JSON_FILE>'
INPUT_SUBSCRIPTION = "projects/<PROJECT_ID>/subscriptions/<YOUR_PUBSUB_SUBSCRIPTION>"
BIGQUERY_TABLE = "<PROJECT_ID>:<DATASET_ID>.<TABLE_NAME>"
BIGQUERY_SCHEMA = "text:STRING, id:STRING, created_at:STRING, timestamp:TIMESTAMP, tweet:STRING, sentiment_score:FLOAT, magnitude_score:FLOAT"class CustomParsing(beam.DoFn):
    """ Custom ParallelDo class to apply a custom transformation """def to_runner_api_parameter(self, unused_context):
        return "beam:transforms:custom_parsing:custom_v0", Nonedef process(self, element: bytes, timestamp=beam.DoFn.TimestampParam, window=beam.DoFn.WindowParam):
        # Super important to keep this import here and not at the top.
        from google.cloud import language_v1
        parsed = json.loads(element.decode("utf-8"))
        text = parsed["text"]
        # Removes website URLs
        text = re.sub('http://\S+|https://\S+', '', text)
        # Removes mentions
        text = re.sub(r"@[A-Za-z0-9]+", "", text)
        # Removes mentions where username has underscores
        text = re.sub(r"@[A-Za-z0-9]+_", "", text)
        # Removes hashtags
        text = re.sub(r"#[A-Za-z0-9]+", "", text)
        # Removes punctuation
        text = re.sub(r'[^\w\s]', '', text)
        # Removes retweets
        text = text.replace("RT", "")
        text = text.lower()
        text = text.strip()
        parsed["tweet"] = text
        parsed["timestamp"] = timestamp.to_rfc3339()# Instantiates the Language API client
        client = language_v1.LanguageServiceClient()
        # Analyzes the input text
        document = language_v1.Document(
            content=text, type_=language_v1.Document.Type.PLAIN_TEXT
        )# Detects sentiment
        sentiment = client.analyze_sentiment(
            request={"document": document}
        ).document_sentiment
        parsed["sentiment_score"] = sentiment.score
        parsed["magnitude_score"] = sentiment.magnitudeyield parseddef run():
    # Parsing arguments
    parser = argparse.ArgumentParser()
    parser.add_argument(
        "--input_subscription",
        help='Input PubSub subscription of the form "projects/<PROJECT_ID>/subscriptions/<YOUR_PUBSUB_SUBSCRIPTION>."',
        default=INPUT_SUBSCRIPTION,
    )
    parser.add_argument(
        "--output_table", help="Output BigQuery Table", default=BIGQUERY_TABLE
    )
    parser.add_argument(
        "--output_schema",
        help="Output BigQuery Schema in text format",
        default=BIGQUERY_SCHEMA,
    )
    known_args, pipeline_args = parser.parse_known_args()# Creating pipeline options
    pipeline_options = PipelineOptions(pipeline_args)
    pipeline_options.view_as(StandardOptions).streaming = True# Defining our pipeline and its steps
    with beam.Pipeline(options=pipeline_options) as p:
        (
            p
            | "ReadFromPubSub" >> beam.io.gcp.pubsub.ReadFromPubSub(
                subscription=known_args.input_subscription, timestamp_attribute=None
		            )
            | "CustomParse" >> beam.ParDo(CustomParsing())
            | "WriteToBigQuery" >> beam.io.WriteToBigQuery(
                known_args.output_table,
                schema=known_args.output_schema,
                write_disposition=beam.io.BigQueryDisposition.WRITE_APPEND
           )
        )if __name__ == "__main__":
    run()
Save the file and run the following command from your terminal to spin up a Beam Runner on Dataflow:
python3 beamtwittersentiment.py \
    --project "<YOUR_PROJECT_ID>" \
    --input_topic "projects/<PROJECT_ID>/subscriptions/<YOUR_PUBSUB_SUBSCRIPTION>" \
    --runner DataflowRunner \
    --staging_location "gs://<YOUR_BEAM_BUCKET>/stg" \
    --temp_location "gs://YOUR_BEAM_BUCKET/temp" \
    --region europe-north1 \
    --save_main_session True \
    --streaming \
    --max_num_workers 1
Confirm that the Dataflow runner is up and running and ready to receive messages.

6. Compute Engine
The Compute Engine VM will act as a relay between the Twitter API and the Pub / Sub Topic and continually stream tweets based on a keyword.
In the GCE/PubSub folder in the local repo there are a couple of files that will help us set up the necessary resources.
First, start by copying over the Service Account Key file (json) to the repo and reference it in tweetstreamer.py, alongside the other credentials from previous steps. Also make sure to change the keyword you would like to track below.
import json
import tweepy
from google.cloud import pubsub_v1
from google.oauth2 import service_account
# Service Account File
key_path = "<YOUR_CREDS.JSON_FILE>"
credentials = service_account.Credentials.from_service_account_file(
    key_path,
    scopes=["https://www.googleapis.com/auth/cloud-platform"]
)
# Pub/Sub Client
pubsub_client = pubsub_v1.PublisherClient(credentials=credentials)
# Pub/Sub Topic(ID, Topic)
topic_path = pubsub_client.topic_path(
    '<YOUR_PUBSUB_ID>', '<YOUR_PUBSUB_TOPIC>')
# # Twitter API Key / Access Token
twitter_api_key = 'YOUR_API_KEY'
twitter_api_secret_key = 'YOUR_API_SECRET_KEY'
twitter_access_token = 'YOUR_ACCESS_TOKEN'
twitter_access_token_secret = 'YOUR_ACCESS_TOKEN_SECRET'
class TweetStreamer(tweepy.Stream):
def on_status(self, status):
        tweet = json.dumps(
            {'id': status.id, 'created_at': status.created_at, 'text': status.text}, default=str)
        print(tweet)
        pubsub_client.publish(topic_path, data=tweet.encode('utf-8'))
def on_error(self, status_code):
        print(status_code)
        if status_code == 420:
            return False
# Initialize steamer instance
streamer = TweetStreamer(
    consumer_key, consumer_secret,
    access_token, access_token_secret
)
# Filter real-time Tweets by keyword
streamer.filter(languages=["en"], track=["Keyword-To-Track"])
Then do the same in startup-script.sh:
cd /home/$USER
apt -qq update
apt-get install -yq python3 python3-pip
gsutil cp gs://<BUCKET_NAME>/pubsub_creds.json .
gsutil cp gs://<BUCKET_NAME>/requirements.txt .
gsutil cp gs://<BUCKET_NAME>/tweetstreamer.py .
pip3 install -r requirements.txt
python3 tweetstreamer.py
I can highly recommend downloading the gcloud CLI tool which will make it much easier to create resources and sync them with the cloud environment.
Upload pubsub_creds.json, requirements.txt, and tweetstreamer.py to the storage bucket referenced above, either by using the console or by using gsutil commands:
gsutil cp pubsub_creds.json gs://<BUCKET_NAME>/ \
gsutil cp tweetstreamer.py gs://<BUCKET_NAME>/ \
gsutil cp requirements.txt gs://<BUCKET_NAME>/
Lastly, run the following command, either from the GCP Cloud Shell or via your local terminal:
gcloud compute instances create <VM_NAME> \
--project=<YOUR_PROJECT_ID> \
--zone=<YOUR_ZONE> \
--machine-type=<INSTANCE_TYPE> \
--service-account=<SERVICE_ACCOUNT_EMAIL> \
--create-disk=auto-delete=yes,boot=yes,device-name=<VM-NAME>,image=projects/debian-cloud/global/images/debian-11-bullseye-v20220920,mode=rw,size=10 \
--metadata=startup-script-url=gs://<BUCKET_NAME>/startup-script.sh
And if you don’t want to SSH into the VM and check for progress you can run the following command locally or in a Cloud Shell to see the startup progress:
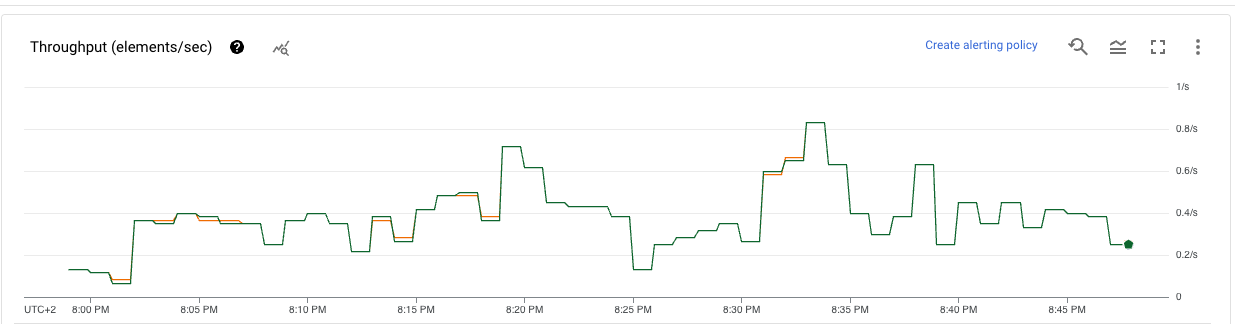
gcloud compute instances get-serial-port-output <VM_NAME> --zone=<YOUR_ZONE>After a minute or two, you should start seeing messages in Pub / Sub:

And in Dataflow:
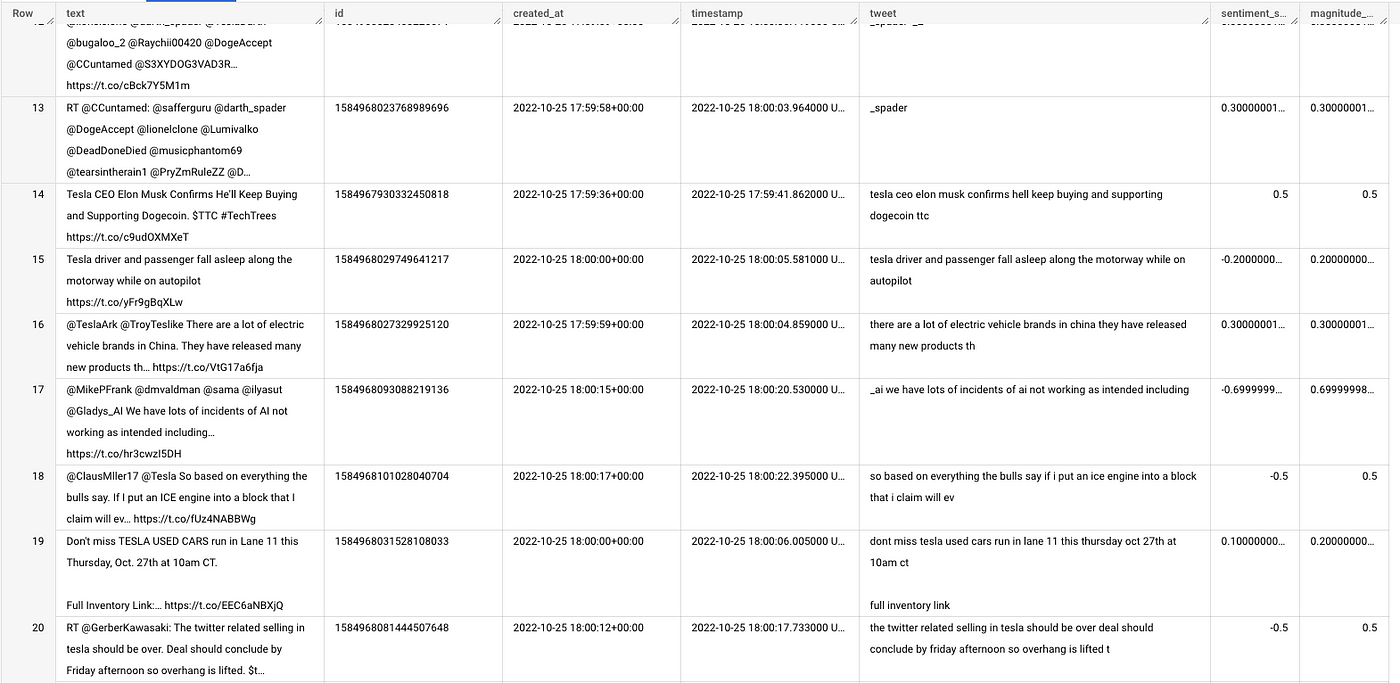
And finally the output in BigQuery:
Conclusions
There you have it! A nifty little streaming pipeline for real-time sentiment analysis.
I ran the pipeline for about four days before spinning it down. It tracked the keyword Tesla (as sentiment seems to vary quite drastically on this topic at the moment) and the pipeline ended up collecting around 300k tweets.
The only major problem I encountered was that the Natural Language API is limited to a list of supported languages. Although the language is set to English as a filter in the API fetching stage, some tweets manage to get through and subsequently an error is raised in Dataflow. However, these messages are discarded and don’t affect the overall performance or throughput to BigQuery.
Make sure to play around with the code and experiment with different keywords, languages, etc. But remember you may end up hitting API rate limits if you choose certain topics that are heavily discussed!