AWS Spark Data Pipeline
In this tutorial we will set up an Apache Airflow workflow that spins up an auto terminating Spark cluster on AWS Elastic Map Reduce (EMR) running Scala Spark. The pipeline ingests and performs a number of transformations on a CSV formatted dataset in S3. The transformed data is then stored in Parquet in S3 again, and finally crawled in Glue for downstream analysis in Athena.
Introduction:
EMR: Apache Spark is an open source framework for processing large datasets across clusters. Due to its popularity it has several programming SDKs, the most prominent of which is the Python implementation, PySpark. In this tutorial we will use Scala however. AWS offers a range of managed Spark cluster services in Elastic MapReduce (EMR) product.
MWAA: In order to orchestrate the ETL process, we will use Managed Workflows for Apache Airflow to configure DAGs that enable us to run our Scala Spark jobs programatically.
The data:
This project is based on Gary Stafford’s article series on ETL solutions in AWS. His articles and youtube videos are a great resource to get up to speed on data engineering topics in AWS. In his article he introduces the Synthea open-source patient population simulation dataset.
Download and prepare the data for Glue and EMR:
First create an S3 bucket using the below S3 commands (see documentation here). Since we intend to run the EMR clusters and MWAA resources in the Stockholm region, it is recommended to also store the data in the same region to reduce S3 ingress / egress charges. This is done by specifying the S3 region at the end of the mb command as per below (n.b the long dash is two dashes):
aws s3 mb s3://<unique-s3-bucket-name> - region eu-north-1Once created, run the following command to confirm that your bucket exists. Or simply check your S3 console:
aws s3 lsWhen have created the raw data bucket it is time to download the Synthea dataset and extract the CSV files for data cataloging and eventually running the transformations.
The datasource used in this tutorial can be found on Synthea’s downloads repo. Click the SyntheticMass Data, Version 2 (24 May, 2017) link to download the tar.gz file. In order to reduce the data transfer needed to get the files from Synthea → Your local computer → S3 you can instead run a -wget command in the AWS command terminal to directly download the file to your specified s3 bucket. Simply change the name s3 bucket name in the command below and paste it into your shell to start the download process.
First, we need to download the dataset locally or using a virtual machine and store it in S3. Run the following command in a terminal environment or run the command remotely from your local machine:
wgethttp://hdx.mitre.org/downloads/syntheticmass/synthea_1m_fhir_3_0_May_24.tar.gztar -xzvf synthea_1m_fhir_3_0_May_24.tar.gzAnd to only extract the CSV files from the tar.gz files use the below command (took some time to figure this out):
for f in *.tar.gz; do tar -xzvf "$f" "*csv*" -C ../synthea; doneSync the CSV folders to your S3 bucket using the S3 Sync CLI command:
aws s3 sync <your-local-synthea-output-folder> s3://<your-S3-bucket-name>Once the CSV files are properly ingested into your S3 bucket it should look something like this:

We can now head over to AWS Glue and run a crawl job on one of the output folders containing the CSV files to get metadata on the different dataset tables.

Specify the S3 bucket location, run the crawl job and wait for the table metadata to appear in the Data Catalog:

Once we have our data prepared, it is always a good idea to explore it. AWS Athena is an excellent tool for data exploration. Amazon Athena is an interactive query service that makes it easy to analyze data in Amazon S3 using standard SQL. This is a great way to start building our Scala Spark queries that we will use in EMR in the next step.
Having explored the different tables, we have a better understanding of the type of transformations that we want to perform on the data in EMR.
In this example we will do some simple data cleansing (removing blanks and duplicates) as well as adding dates and load the transformed data back into S3 in a snappy Parquet format, ready for downstream analysis in Athena.
Before setting up the EMR and MWAA resources in AWS I would highly suggest downloading and running Spark locally on your machine using Docker to get used to the syntax. It’s always a good idea to read through the Spark documentation as well. Use the following command to download the Spark Docker Image and start a shell:
// Pull the docker imagedocker pull apache/spark// Start an interactive Spark shelldocker run -it apache/spark /opt/spark/bin/spark-shell// Try the following command, which should return 1,000,000,000:scala> spark.range(1000 * 1000 * 1000).count()Coming from a data analytics background, I was really happy to learn that Databricks offers a Jupyter Notebooks style workflow for iteratively building Scala Spark code.
Below you can see the Scala code and the associated SBT.build code we need to generate the .JAR file we need to run our Airflow DAG:
transform.scala
package org.eightoheightengineering.transformimport org.apache.spark.SparkContext
import org.apache.spark.sql.{DataFrame, SparkSession}object encounters {
  def main(args: Array[String]): Unit = {val (spark: SparkSession, sc: SparkContext) = createSessionperformELT(spark, sc)
  }def createSession = {
    val spark: SparkSession = SparkSession.builder
      .appName("SyntheaEncountersTransform")
      .master("yarn")
      .config("hive.exec.dynamic.partition",
        "true")
      .config("hive.exec.dynamic.partition.mode",
        "nonstrict")
      .config("hive.exec.max.dynamic.partitions",
        "10000")
      .config("hive.exec.max.dynamic.partitions.pernode",
        "10000")
      .enableHiveSupport()
      .getOrCreate()val sc: SparkContext = spark.sparkContext
    sc.setLogLevel("INFO")

    (spark, sc)
  }def performELT(spark: SparkSession, sc: SparkContext) = {
    val df = spark.read.option("header", "true").csv("s3:/<your-raw-data-location/encounters.csv>")

    df.createOrReplaceTempView("encounters_file")
    val transformed_df = spark.sql(
      """
        SELECT DISTINCT
            id,
            patient,
            code,
            description,
            year(date) as year,
            month(date) as month,
            day(date) as day,
            date
        FROM encounters_file
        WHERE date <> 'date';
      """)transformed_df
        .write
        .mode("overwrite")
        .parquet("s3://<your-destination-S3-bucket/encounters.parquet>")
  }
}
sbt.build (note that the Spark version needs to match the requirements for the EMR version you choose)
name := "transform"
version := "1.0"
organization := "org.eightoheightengineering.transform"
libraryDependencies += "org.scala-lang" % "scala-library" % "2.12.0"
val sparkVersion = "3.0.0"
libraryDependencies ++= Seq(
  "org.apache.spark" %% "spark-core" % sparkVersion,
  "org.apache.spark" %% "spark-sql" % sparkVersion,
  "org.apache.spark" %% "spark-hive" % sparkVersion
)
Run sbt package and upload the .jar file to your EMR JAR bucket.
Setting up AWS MWAA:
AWS Managed Workflows for Apache Airflow is a highly available, secure, and managed workflow orchestration for Apache Airflow.
Luckily, AWS offers a Docker image for testing purposes which I would recommend you use to test your DAGs before setting up MWAA and reduce your monthly bill :)
The MWAA local runner repo can be found here: https://github.com/aws/aws-mwaa-local-runner
Download Docker Desktop, start it up, and run the following command to set up the local MWAA environment:
git clonehttps://github.com/aws/aws-mwaa-local-runner.git /
cd aws-mwaa-local-runner /
./mwaa-local-env build-image /
./mwaa-local-env start
There are several ways to authenticate the local Airflow runner to your AWS account. I opted for passing my AWS credentials as environment variables to the docker-compose-local.yml file:
AWS_ACCESS_KEY_ID=<YOUR-ACCESS-KEY>
AWS_SECRET_ACCESS_KEY=<YOUR-SECRET-ACCESS-KEY>
AWS_DEFAULT_REGION=<YOUR-DEFAULT-REGION>
If you want to make sure that you have authenticated correctly you can run the following:
docker -ps // Copy the MWAA container ID into the next command to access the Docker shelldocker exec -it <MWAA Local Container ID> bash
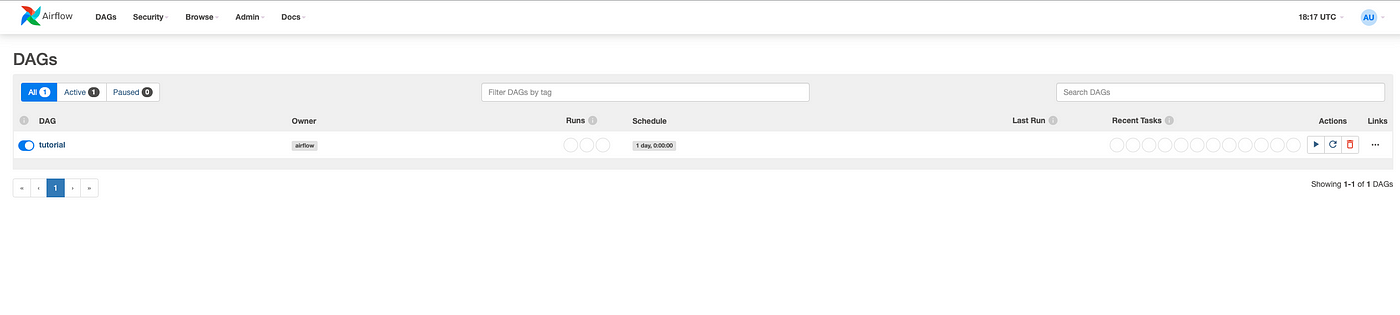
// List your S3 Buckets, if you can see them, it means Airflow has successfully been authenticated and has access to your AWS environemntaws s3 lsWith all of that out of the way, head to you browser and type in http://localhost:8080/ and you should see the Airflow UI with an example DAG:
Importing and configuring the EMR DAG:
Head over to your IDE (I use VSCode) and open the aws-mwaa-local-runner folder and locate the DAG folder:

Create a new .py file under the DAG folder and paste the below code into it:
import os
from datetime import timedeltafrom airflow import DAG
from airflow.contrib.operators.emr_add_steps_operator import EmrAddStepsOperator
from airflow.contrib.operators.emr_create_job_flow_operator import EmrCreateJobFlowOperator
from airflow.contrib.sensors.emr_step_sensor import EmrStepSensor
from airflow.utils.dates import days_agoDAG_ID = os.path.basename(__file__).replace('.py', '')DEFAULT_ARGS = {
'owner': 'airflow',
'depends_on_past': False,
'email': ['airflow@example.com'],
'email_on_failure': False,
'email_on_retry': False,
}SPARK_STEPS = [
{
'Name': 'transform',
'ActionOnFailure': 'CONTINUE',
'HadoopJarStep': {
'Jar': 'command-runner.jar',
'Args': [
"spark-submit",
"--deploy-mode", "cluster",
"--class", "org.eightoheightengineering.transform.encounters",
"s3://<your-EMR-JAR-Bucket-Location>"],
},
}
]JOB_FLOW_OVERRIDES = {
'Name': 'demo-cluster-airflow',
'ReleaseLabel': 'emr-6.1.0',
'Applications': [
{
'Name': 'Spark'
},
],
'Instances': {
'InstanceGroups': [
{
'Name': 'Master nodes',
'Market': 'ON_DEMAND',
'InstanceRole': 'MASTER',
'InstanceType': 'm5.xlarge',
'InstanceCount': 1,
}
],
'KeepJobFlowAliveWhenNoSteps': False,
'TerminationProtected': False,
},
'VisibleToAllUsers': True,
'JobFlowRole': 'EMR_EC2_DefaultRole',
'ServiceRole': 'EMR_DefaultRole',
'Tags': [
{
'Key': 'Environment',
'Value': 'Development'
},
{
'Key': 'Name',
'Value': 'Airflow EMR Demo Project'
},
{
'Key': 'Owner',
'Value': 'Data Analytics Team'
}
]
}with DAG(
dag_id=DAG_ID,
description='Run built-in Spark app on Amazon EMR',
default_args=DEFAULT_ARGS,
dagrun_timeout=timedelta(hours=2),
start_date=days_ago(1),
schedule_interval='@once',
tags=['emr'],
) as dag:
cluster_creator = EmrCreateJobFlowOperator(
task_id='create_job_flow',
job_flow_overrides=JOB_FLOW_OVERRIDES
)step_adder = EmrAddStepsOperator(
task_id='add_steps',
job_flow_id="{{ task_instance.xcom_pull(task_ids='create_job_flow', key='return_value') }}",
aws_conn_id='aws_default',
steps=SPARK_STEPS,
)step_checker = EmrStepSensor(
task_id='watch_step',
job_flow_id="{{ task_instance.xcom_pull('create_job_flow', key='return_value') }}",
step_id="{{ task_instance.xcom_pull(task_ids='add_steps', key='return_value')[0] }}",
aws_conn_id='aws_default',
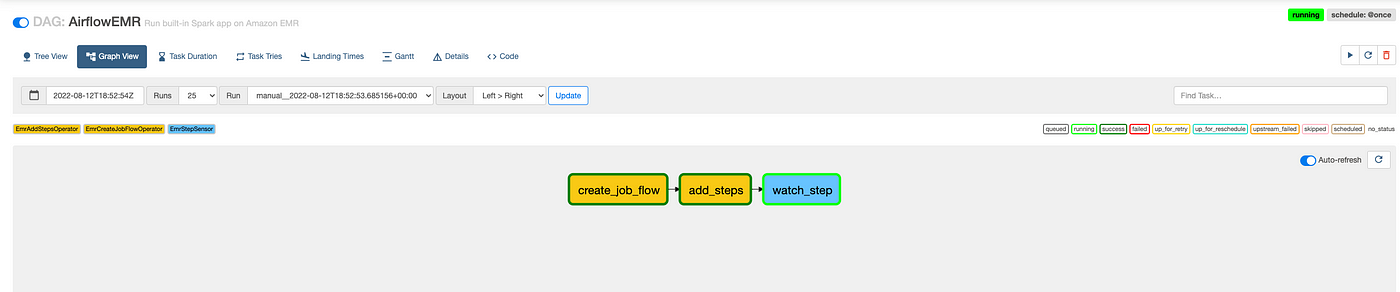
)cluster_creator >> step_adder >> step_checkerSave the file and wait for 30 seconds and update the Airflow UI in your browser to see the newly created DAG:

Before we run our first DAG we need to specify the EMR log bucket location. This is in order for EMR to be able to output messages and not fail. Head over to the Airflow UI and locate the emr_default connection under Admin/Connections and change “LogUri”: “s3://<your-EMR-logs-bucket”:

Now we are all set to run our DAG, which spins up an auto-terminating EMR cluster, runs our Spark JAR, and outputs the transformed data to a snappy Parquet file. Trigger the DAG under Actions and head to your AWS console wait for EMR to spin up and process the step:

Voila! Now we wait for EMR to provision the necessary resources and run our JAR file. Try counting how many times you refresh the page. I average 50 times per run :)
You can also check the status of the DAG in Airflow:
Success! Head over to your specified output folder and confirm that the parquet file is available.

Head back to Glue and crawl the Parquet file:
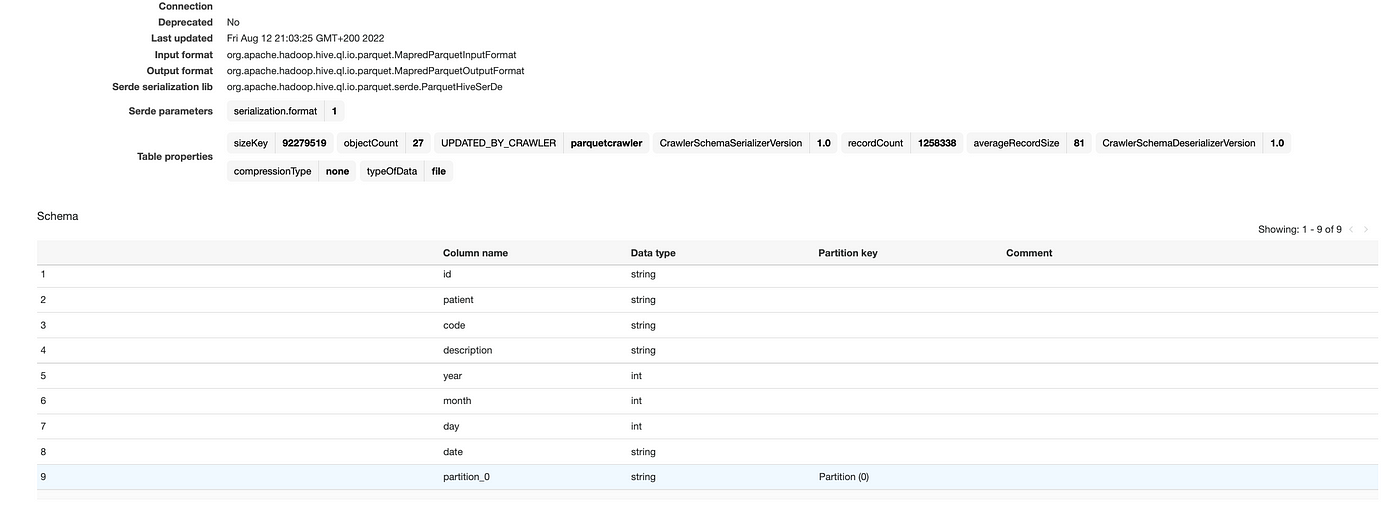
Finally, open Athena and query the transformed data:

Next Steps:
In order to better simulate the daily influx of data (updates to existing patient records or new patients coming into the system) I am going to set up an EC2 Instance running the Synthea data generator code and run the pipeline on the new data every 24h.